
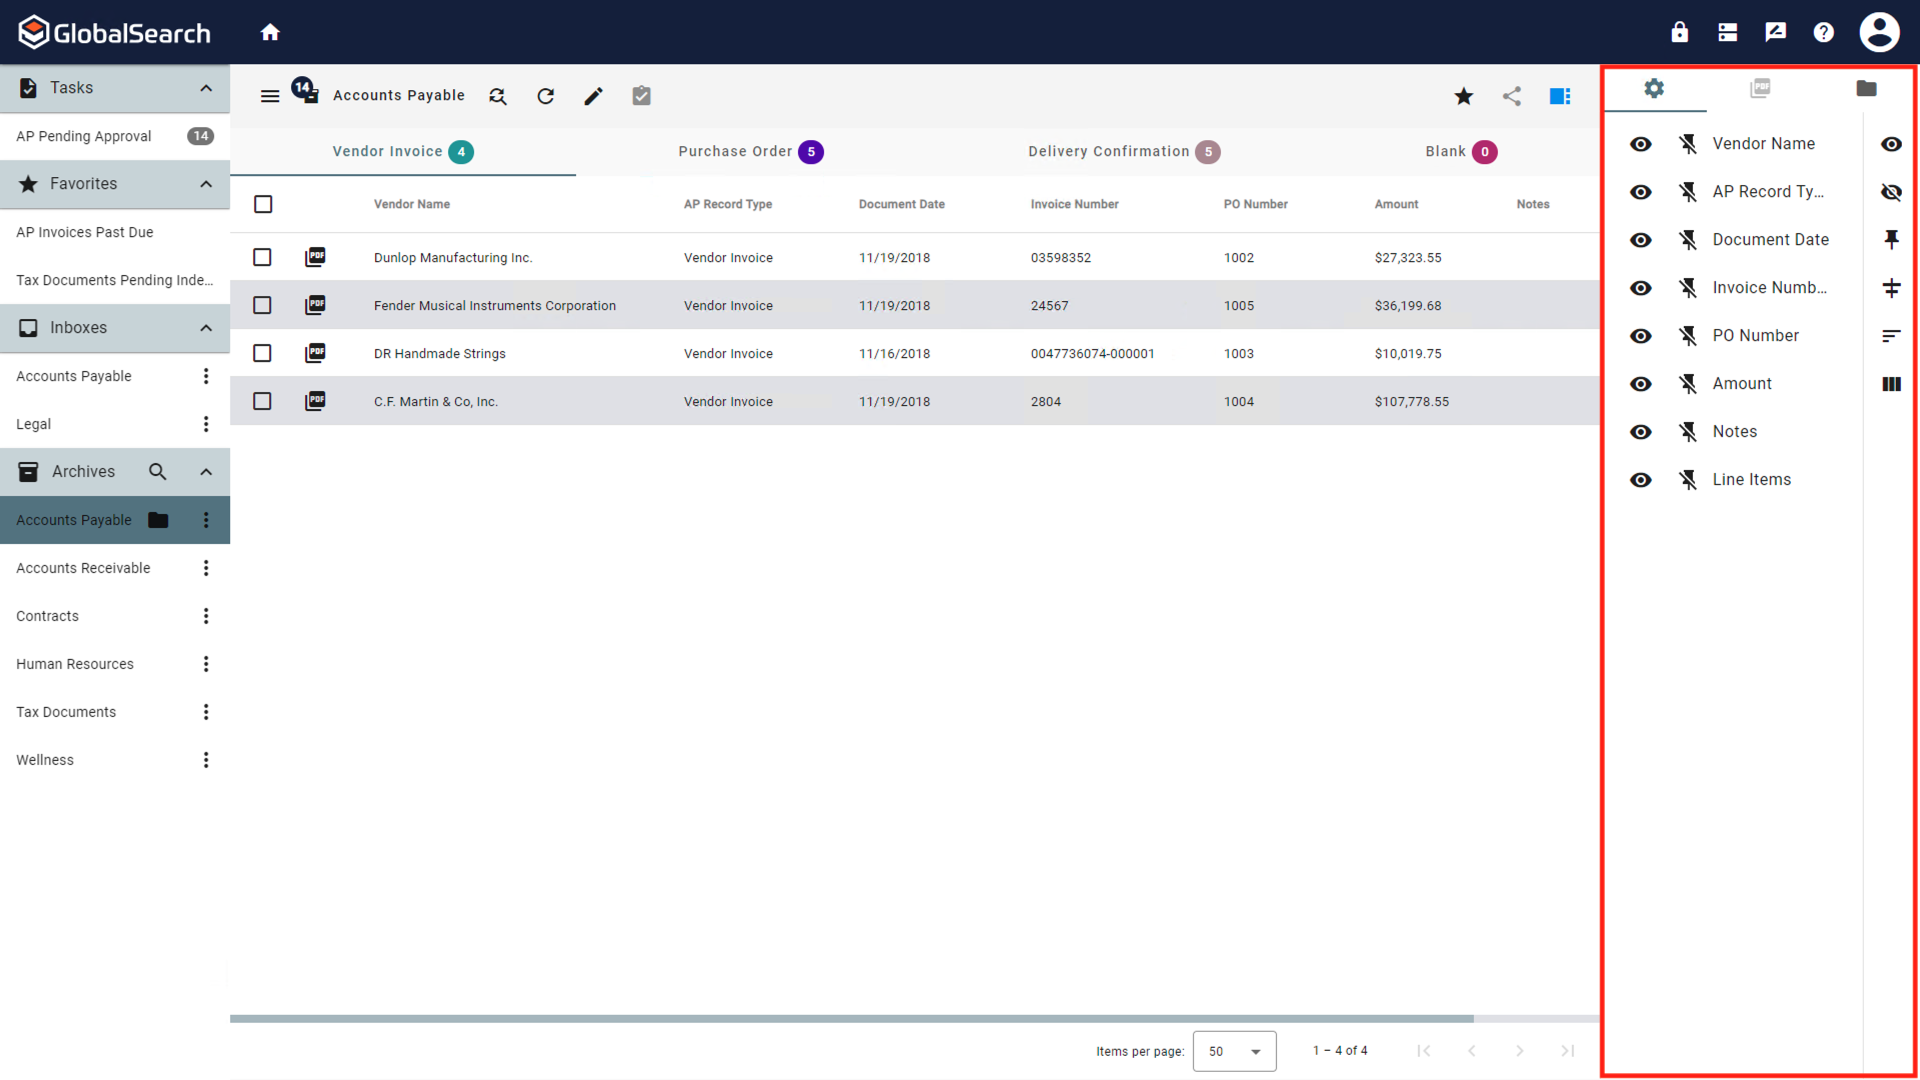
Search Results View Sidebar
The Search Results View Sidebar (  ) appears on the right side of the Search Results View and, when expanded, allows you to customize your Search Results Grid, Preview the Document, and view Archive and Document History.
Search Results View Sidebar
Opening and Closing the Search Results View Sidebar
Expand and collapse the indexer using the Indexer ( ) icon located in the Document Viewer Toolbar.
Grid Setting
You can configure how the columns of Index Field values display using the Grid Menu. Your settings persist for each Archive, are saved to your browser cache, and only affect your personal user settings.
Click the Grid Tab (
 ) icon to display the Grid options.
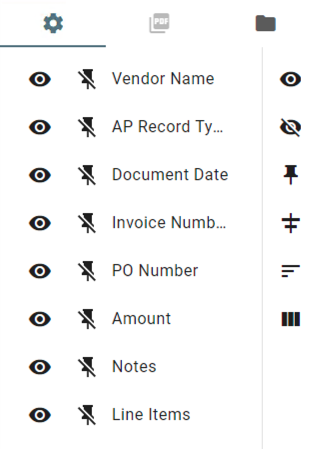
To select column display options, in the Column Settings Sidebar that appears on the right, choose from the following:
Column Visibility – Show or hide individual Index Field columns in the Grid View using the Visibility toggle switch. (The default is to display columns.) The Visibility (
 ) icon indicates that the column is visible and the Hide (
  ) icon indicates that it is hidden. Click the icon for individual Index Fields in the Column Settings List on the left or click on the Show All Columns ( ) or Hide All Columns ( ) icon in the Column Settings Sidebar on the right.
Column Pinning – Pin a column to the left-hand side or right-hand or of the Document List so that the column is always visible when scrolling across rows of records using the Pin (
 ) switch. (This is off by default.) This is a three-way switch: the Pin Left (
  ) icon indicates that a column is pinned to the left side of the Document List, the Pin Right (
 .png?inst-v=322eb5ef-524a-4fa1-8d18-53b48afcbdcd) ) icon indicates that a column is pinned to the right side, and the Unpin (
) icon indicates that a column is pinned to the right side, and the Unpin (  ) icon indicates that pinning is cleared. Click the icon for individual Index Fields in the Column Settings List on the left or click on the Unpin All Columns ( )icon in the Column Settings Sidebar on the right to clear pinning from all of the Index Field columns.
Fit to Column Width (
 ) – Click the Fit to Column Width icon to resize all column widths based on the data in the cells.
 Remove All Sorts (
 ) - Removes any sorting applied to the columns.
Reset Layout (
 ) - Click the Reset Layout icon to restore column widths.
Grid Settings
PDF Preview
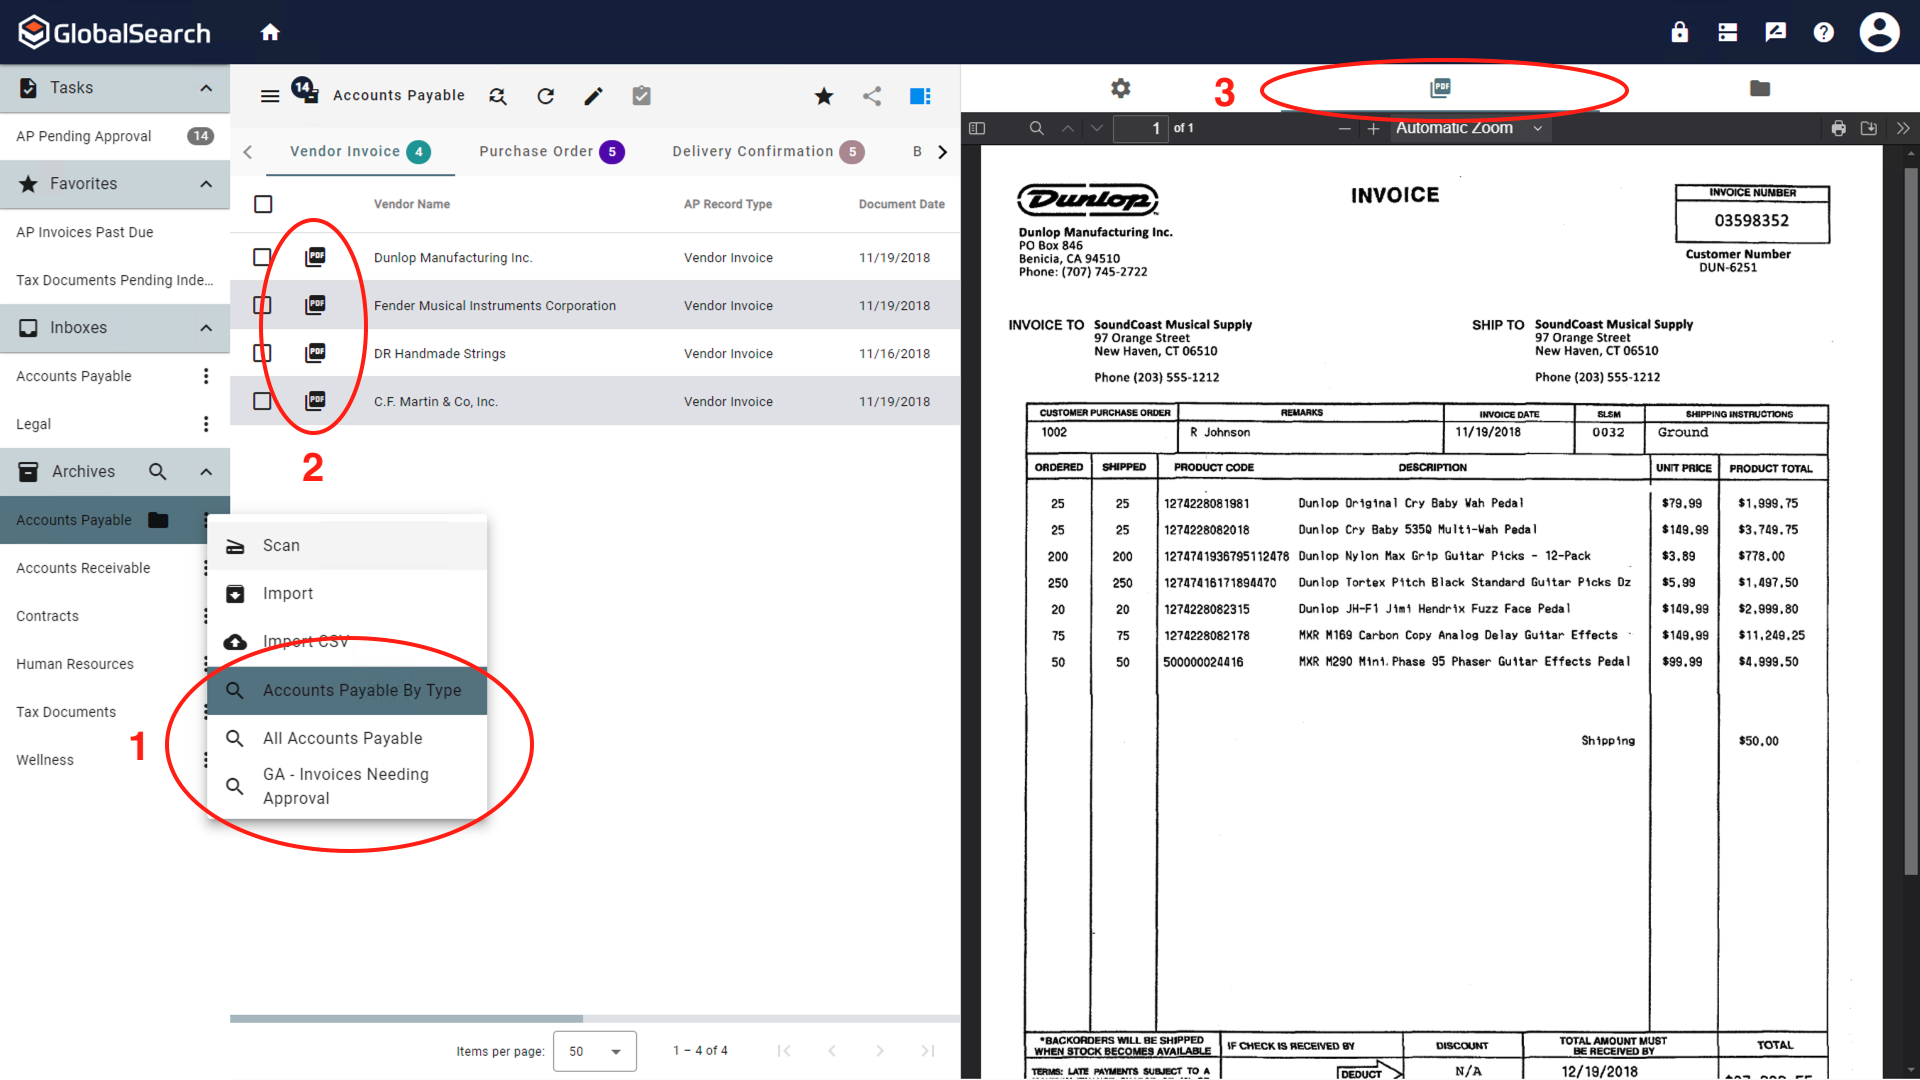
PDF Preview allows you to preview the document in the Right Sidebar of the Search Results View. You can perform any actions on the document that appear in the Document pane such as Find in Document or using the different Tools.
To preview a document in the PDF Preview Tab of the Search Results View sidebar:
Select an Archive that has a Default Search defined or run a Search on an Archive you have permissions to.
Click the File Type icon. The Search Results View sidebar will open to the PDF Preview tab and display the document.
PDF Preview Tab
The PDF Preview window only refreshes when the File Type is selected even if a different document selector is enabled.
Document History
Access to History requires View History permissions.
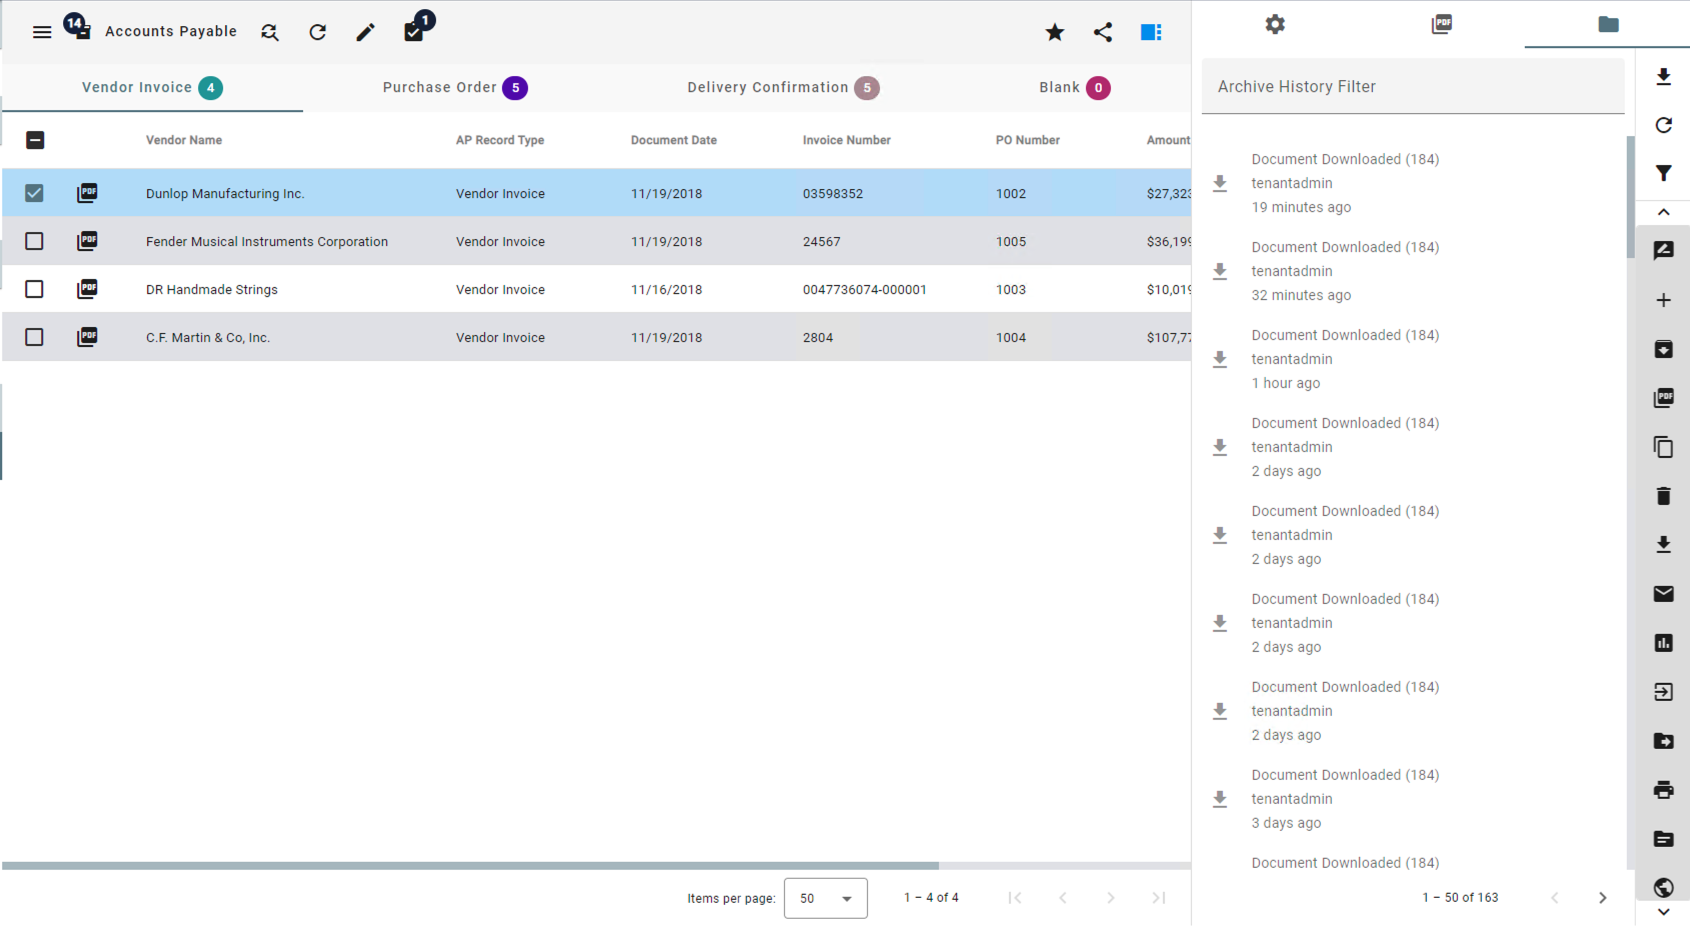
Archive History
The Document History panel shows the history of all documents in an Archive, with each action taken displayed as an entry in the list. The entries are presented in one or more pages, sorted from most recent changes to oldest. If you have more than one page of results, use the page carousel at the bottom of the Document History pane to navigate through the results. Each entity in the list displays an action icon, the username of the person who performed the action, how long ago the action occurred, and the Document ID number. If you need to need to focus on only certain types of actions, you can click the icon for one or more entities to toggle the filter on or off for that type of action. These are contextual; each action type has its own icon.
View the History of Actions Taken on Documents in an Archive
To view a history of actions taken on documents, select an Archive that has a Default Search defined or run a Search on an Archive you have permissions to.
Click the Document History Tab (
 ) icon to display the history.

Archive History
View Document History
The Document History panel shows the history of selected document(s), with each action taken displayed as an entry in the list. The entries are presented in a single page, sorted from most recent changes to oldest. Each entity in the list displays an action icon, the username of the person who performed the action, how long ago the action was performed, and the Document ID number. If you need to need to focus on only certain types of actions, you can click the icon for one or more entities to toggle the filter on or off for that type of action. These are contextual; each action type has its own icon.
View the History of Actions Taken on a Document
To view a history of actions taken on a specific document or multiple specific documents, select an Archive that has a Default Search defined or run a Search on an Archive you have permissions to that returns the desired document.
Click the Document History Tab (
) icon to display the history.Use the Document Selector to select the document(s) of which to display the history.
Document History
Filtering Archive/Document History
Depending on your use case, the history of a given Archive or Document may be significant. To filter to a shorter, more focused list of actions, you can type text to filter by or choose one or more action types to filter them out of the list. Note that the history displayed may not directly correspond to the document records currently in view and the filtering only applies to the current page of History. You can alter the page length displayed in the User Settings.
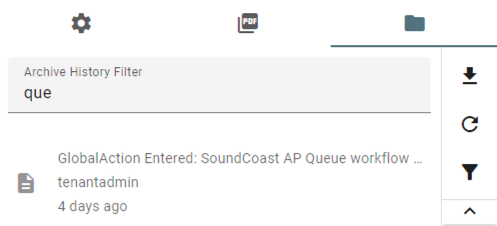
Using the Archive History Filter
Directly beneath the title bar of the Archive History panel, the Archive History Filter text box is available for free-form text entry. Use this text box to filter by any text appearing in the history. This might include the Action (Document Exported), the user performing the action, a Document's ID (ID: 20), or a date (Aug 6). Results filtered using this option are limited to the current page of history displayed. You can alter the page length displayed on the Search Tab of your User Settings. The Archive History Filter may be used in conjunction with the Document History toolbar described below.
Archive History Filter
Using the Document History Toolbar
The toolbar provides a visual way to quickly filter down document history. Click on one or more action icons in the Document History toolbar to the right. (The icon will be grayed out to let you know that it is being filtered out of your results.) Use the Up and Down arrows to scroll through the list of available actions. Actions include.
Bulk Actions include Exporting, Refreshing, and Turn on All Filters.
Refine History Actions include annotations, converting, downloaded, tec.

History Filters